
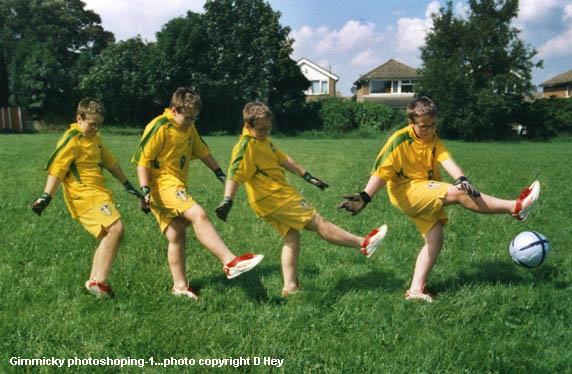
Thanks to Adobe Photoshop I've now added more photos to the collection
The reason I have posted this page on the web is because some time ago I received a belligerent email from a railway enthusiast, simmering with rage…'f' expletives an' all! Now I won't go into the gory details, nor give you his name, but I will explain the basis of his grievance. He was beefing about the copious use of skyscapes and clouds in some of the photographs on this site. Okay, he might have a valid point, though he was completely wrong about the reasons, and bang out of order about my intentions. Let me explain...
I make no bones about the fact that some photos on this website have been digitally enhance in Adobe Photoshop. Indeed, had they not been digitally 'tweaked' they would probably never have seen the light of day in the normal way. So to be accused of 'downright cheating' seems totally disproportionate to my so-called 'devious crime' of retouching old photographs, particularly as I have only the interests of the photographers in mind. I have since contacted my accuser (glutton for punishment, or what?) and we've settled our differences via email, so the matter is now closed. Nonetheless his accusations of 'cheating' still niggles with all the insistency of a trapped nerve. What if there are others out there who think the same way? People who think I am blatantly attempting to pull the wool over their eyes? So, with that thought in mind, I've decided to devote a whole page to the subject and set the record straight...
(Below Left) Photoshop is a powerful graphics programme used by designers for image manipulation. It is a veritable computer darkroom complete with a toolbox that holds all the tools you need to work on a picture. However, since I have only modest ability, I'm rather like a small boy rummaging in a toy cupboard than a cutting-edge designer working at the sharp point in a studio. I've probably clocked up more than ten thousand hours of practise over the years (producing many disasters along the way) so I am nowhere near to exploiting its full potential. Instead I've concentrated on photo-retouching, including sharpening, improving brightness and contrast; removing spots or other unsightly blemishes. For example, I love Jim Carter's shot of 'Black 5' No 44892 leaving Manchester. The smoke effect is magnificent, the lighting superb; the composition has all the right ingrediants to lift the photo well above the average. Unfortunately, Jim's original shot suffered from clumsy 'burning' and 'dodging' during the printing stage, but this has now been improved using the Adobe programme.
 | 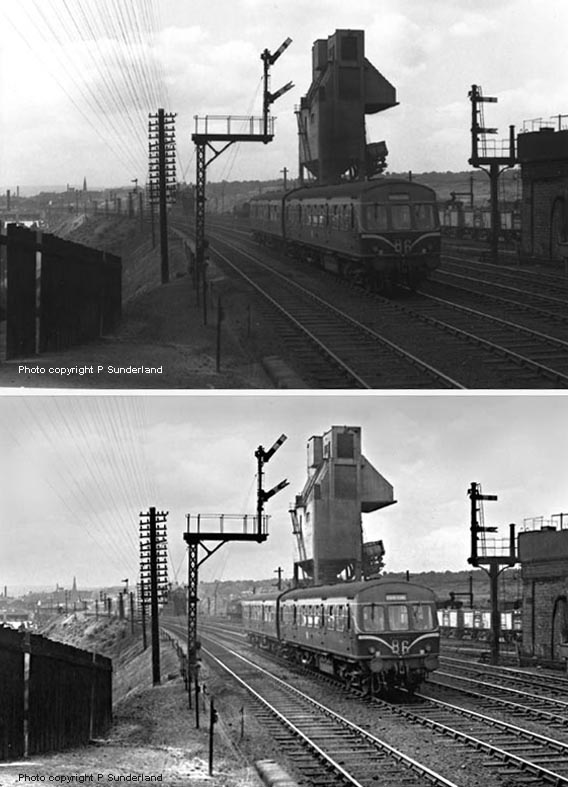 |
(Above Right) A lot of the railway photos I work on have been machine-printed by a processing laboratory, in which case the shots might be under-over exposed (either too light or too dark) and finish up in the bottom of a drawer. Peter Sunderland's evocative photo is a 1st class record of the transition from steam and shows a 2-car Metro-Cammell dmu passing Millhouse shed on a Huddersfield-Bradford Exchange service in May 1962. It was a great pleasure working on this shot. Okay, the end result may not be 'picture perfect', but the time spent on it was worthwhile.
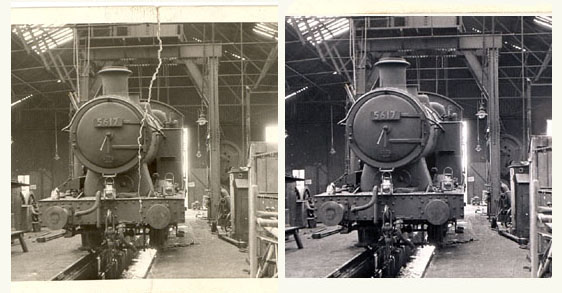
(Above-Below) If you want to improve a favourite railway photo, it is simply not enough to use brightness and contrast on its own - you will lose too much detail in the process. For example, Roy Lambeth's 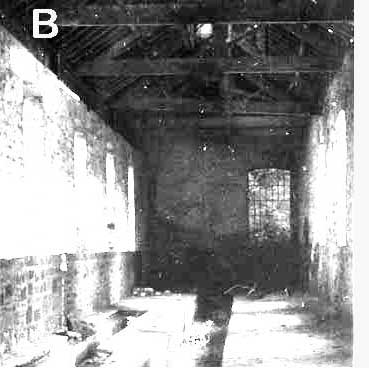 interesting interior shot of Stanhope Shed suffers terribly from bad lighting, but it is well worth rescuing for all that. The shed's one claim to fame is that it was used to store members of the National Collection during the war years 1939-45.
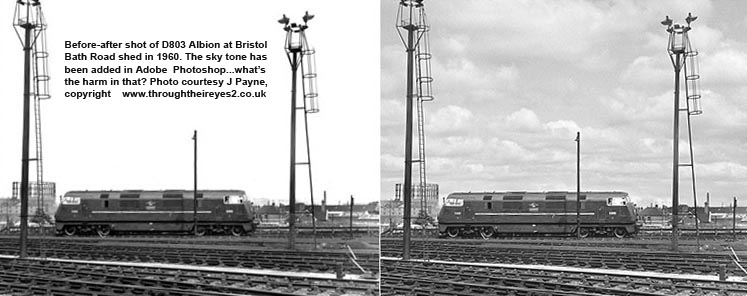
The pre-Photoshop shot (above left) was taken on 26th August 1964 just prior to demolition. The finished shot (above right) is an ex-Adobe Photoshop digital image.
So how is it done?
First import the original photo 'A' into Adobe Photoshop, then save it as 'B' - this will be used as a template.
Next highlight the roof area in 'B' by blasting the whole photo with brightness and contrast to the detriment of everything else in the shot - see inset (left). Then using the clone tool (rubber stamp icon) click on mouse (simultaneously press ALT) and pick up a tiny section of highlighted roof from template 'B' and transfer this image to the exact same spot on 'Stanhope Shed A'.
I probably had 4-5 attempts at cloning, each time altering the brightness-contrast on 'B' then adding the cloned details on top of each other until the roof in 'A' section began to take shape. Next I concentrated on the sunlit windows and walls, first darkening the whole photo 'B' until it was almost black, then using the clone tool again, picking up the selected image from the sunlit area and transferring this to the exact same area on 'A'.
In its simplest terms, by digitally 'dodging' and 'burning' on the donor photo 'B' you can juggle the tonal values and 'marry' them to the recipient photo. It might take several attempts - and, of course, you don't always get it right first time, but it is worth a try...please remember that these images are reproduced at very low resolution specifically for the web.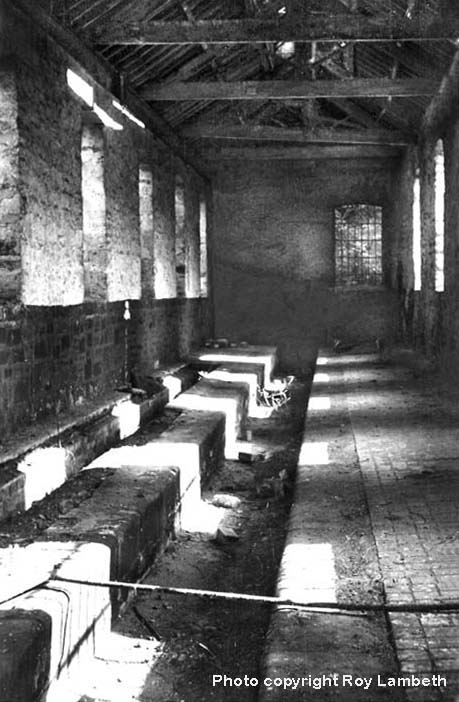
YOU'RE NEVER TOO OLD TO LEARN!
I have recently been contacted by Brian Cooke, who, like many other steam enthusiasts during the Sixties, became disillusioned with the changeover from steam to diesels. In Brian's case, it was the decline of steam to his east-coast home town of Scarborough that brought an end to his railway photography in 1964.
However, Brian's interest in photography was about to take a new turn. He decided to combine his love of 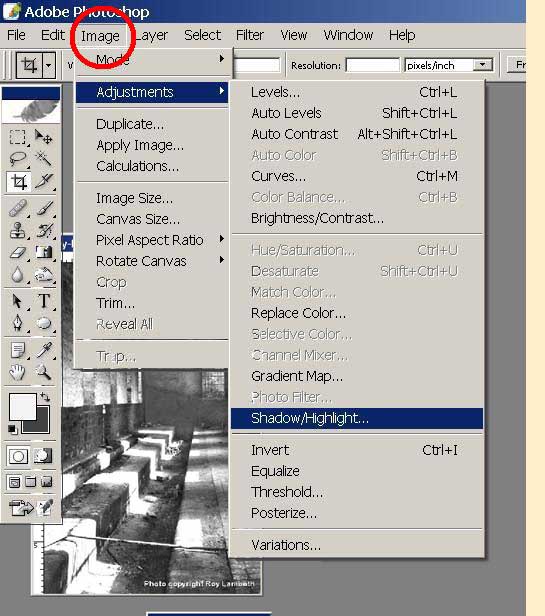 photography and music and this led to his appointment as in-house photographer with Island Records' from 1971 to 1976. His successful career as a photographer in the music industry can be found here…a fascinating story and well worth a visit for its nostalgia value alone!
Getting to the point…
Brian kindly brought my attention to an application in Adobe Photoshop called 'Shadow Highlight' - which, to be honest, I knew nothing about!
However, keen to learn more about the intricacies of Adobe Photoshop I gave it a try…and, blow me down, despite my first fumbling attempt, it works!
So, if you are interested in making photo retouching a little easier, follow these guidelines - click-on 'Images' on the top menu bar then 'click-on' the drop-down menus; click-on 'Adjustments' followed by 'Shadows/Highlights' and it opens a slide bar mentioned below.
This application is a useful method for bringing out detail in wheels and motion in pesky shadows and exhaust and clouds in the highlights.
Brian has kindly added a few comments of his own (below) which might help visitors revive old railway photos of their own...it's always worth a try!
While enjoying David's site, I couldn't help notice what I considered to be an off-the-wall method of bringing out detail in shadows and highlights on his Railway Photo Workshop page. While the example picture of Stanhope Shed is rather extreme, possibly requiring an extreme solution, I suggested a simpler route using Shadows/Highlights in Photoshop's Image - Adjustments, for easier subjects.
David admitted he had not even noticed this and has asked me to explain. Pictures are a subjective medium and everyone has their ideas about what makes a good image. For me, I very rarely use a scan of an old negative or a file from a modern digital camera without applying some level of adjustment to the shadows and/or highlights. This is a pretty basic image editing tool so it should be available in all this kind of software. Why do we need this?
In the old days, when printing film negatives onto photographic paper, most prints required some element of dodging (holding back of shadows) and/or burning in (darkening of highlights) because film records a greater tonal range than the paper is able to reproduce.
Without dodging and burning, detail would be lost in either or both the shadows and highlights. Likewise in the digital age, scanners and digital cameras are capable of recording an even greater tonal range, which is more than monitors, digital projectors or modern printing systems can reproduce.
So how do I get to see this detail?
Below are two similar pictures, taken at quite different times.
The first is from an Halina 35X black & white negative and shows Class J50 68892 having its number taken by Brian Webb during a visit by the Scarborough Railway Society to Leeds Copley Hill shed on 8th April 1962.
(Above) Many years later is this colour photo taken on my iPhone using the Hipstamatic app, of K1 62005 at Carnforth in January 2013. This app delivers contrasty images in any event, so this is a good example to demonstrate the possibilities. In both cases I have shown the original, with the sliders at zero, and the adjusted picture with the amount of shadow/highlight adjustment used.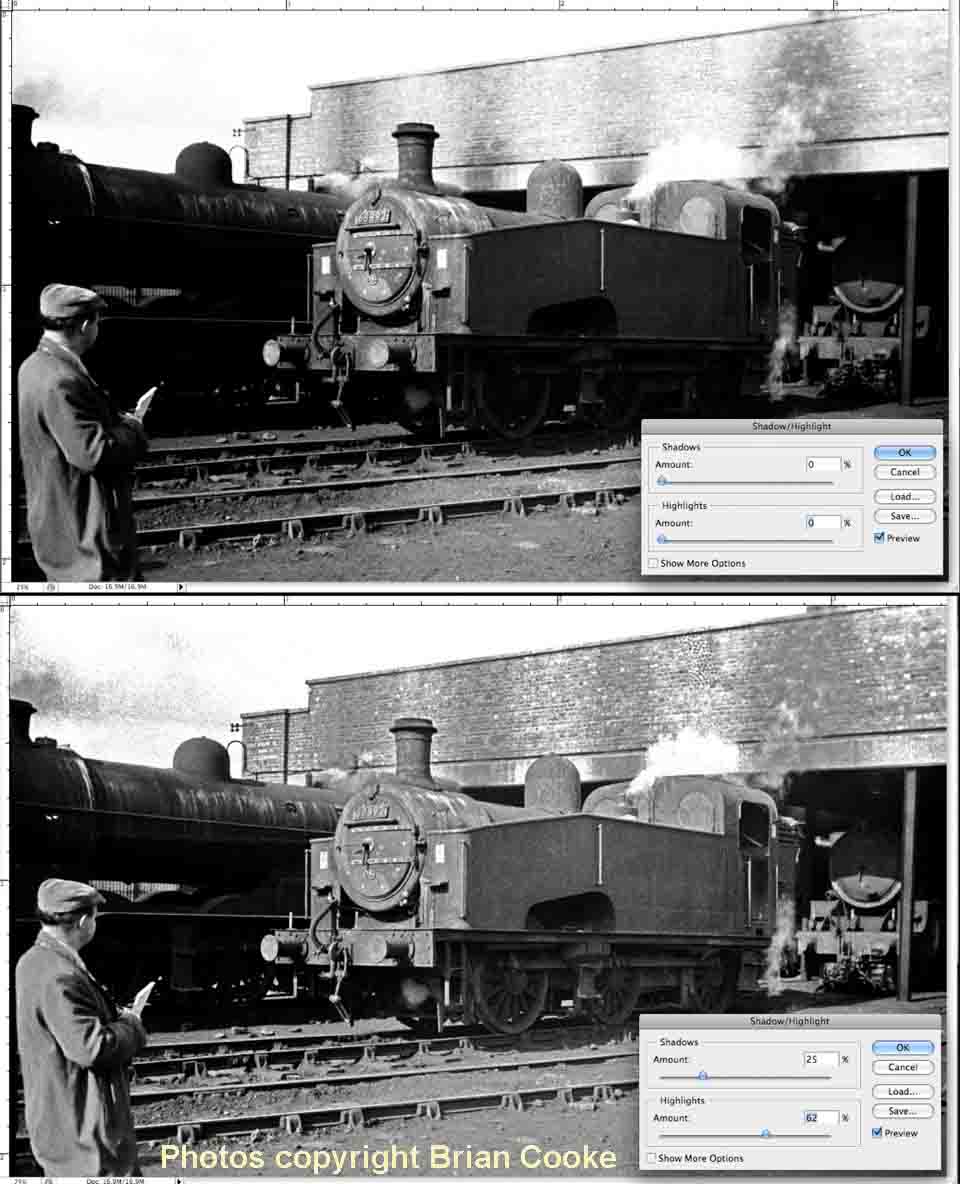
Thanks for the advice, Brian.
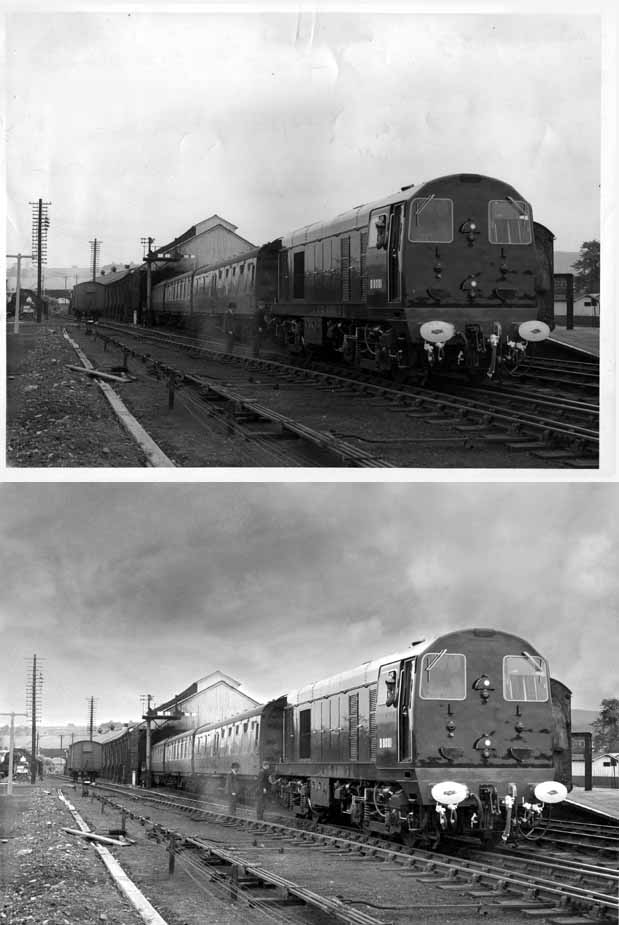
(Above & Below) Two further examples of Photoshopping using the same technique as described above. Using a clone stamp to transfer highlighted sections and other details from one photo to another, both photos are an improvement on the originals...the above photo of newly-built EE Type 1 No D8001 on a test train at Penrith is from the GEC-Alstom archives. (Below) This interesting ER Morten photo is of historical importance as it shows Apperley Bridge on the Aire Valley line between Leeds and Shipley; this particular spot has been earmarked for a proposed new railway station.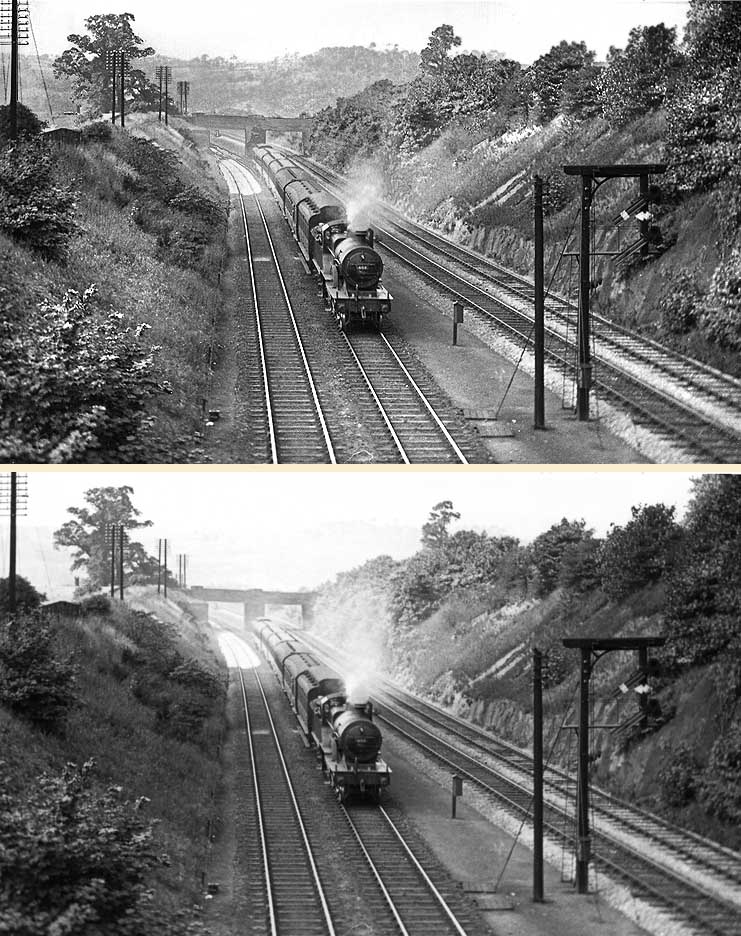
(Below) I'm sure there are plenty of 'old timers' out there (pre-digital cameramen) who remember the old days when they' 'dabbed' away at niggling white spots on a print with a ballpoint pen, trying to remove unsightly blemishes caused by contaminated chemicals, dust and hairs on the lens - and the worst enemy of all, old age. Whatever the reason, most blemishes can be digitally removed from photographs relatively simply nowadays, though this depends on the extent of damage and the part of the photo on which the blemish occurs. For instance, a sky is easier to clean than a locomotive's valve gear. I'll start with Jim Carter's cracking shot of an EE Co Type 4 heading the northbound 'Mid-day Scot' at Warrington. Judging from the state of the original transparency it is in dire need of some personal care and attention…and deservedly so.
(Above Left & Right) The original 35mm colour slide looks as if it has been ridden over by a scramble bike! The whole upper area is covered in tyre tracks and the sky is lacking any colour tone whatsoever. There are two ways of cleaning it up - a clone stamp or paintbrush. I used the latter, first using a marquee tool to select the area of sky I wanted to work, then selecting a white tone (to match the sky) from the colour palette and gingerly painting out blemishes around the chimneys and horizon, then the whole sky. Finally I used the clone stamp to remove the spots on the buildings. So, having prepared the sky, what to do next?
(Above) The next stage is a prickly subject because it relates to the accusations lodged against me in the email I mentioned earlier. I'm talking about copyright legislation. As you will already know, many sites add a visible watermark to a 'downloadable' photograph from the web. This consists of either a piece of text, website logo, or a © copyright notice to identify the rightful copyright owner. These translucent watermarks are commonly used to identify images on a site, not only to protect them from unauthorised use, but to ensure the images are difficult to copy by some scurrilous character who attempts to claim someone else's photo as their own. So what is the solution? Should one stamp a copyright notice all over the picture? The example is a wee-bit over the top - translucent it's not - yet it illustrates the point perfectly...it looks awful!
(Below) So is there an alternative to using watermarks? Yes there is, only it's a painfully slow process. In the past I've tried stamping various watermarks on photos, but found their placement on top of an image a bit tricky. For starters, I didn't want to detract from the contents of the photo too much, and I didn't want to place the watermark in an area where its removal can be easily concealed. Instead, I set about adding the cautionary warning text - 'Photo copyright cameraman's name' - in a bottom corner, but because this only takes up a small proportion of the overall image area, it really wasn't enough. What was needed was something bigger and better, something that takes up a large percentage of the overall image area, and the only satisfactory solution I could think of was the sky. Eureka! It seemed the perfect choice, particularly as the photographs I'm working on were taken before graduated filters came on the market, and the skies invariably have no tones whatsoever. Is it cheating? Until I get some feedback on the subject, the jury is still out in that regard. In my scheme of things, though, not only am I stamping the pictures on this site with their very own personal watermarks, I'm enhancing them along the way...just what the doctor ordered!
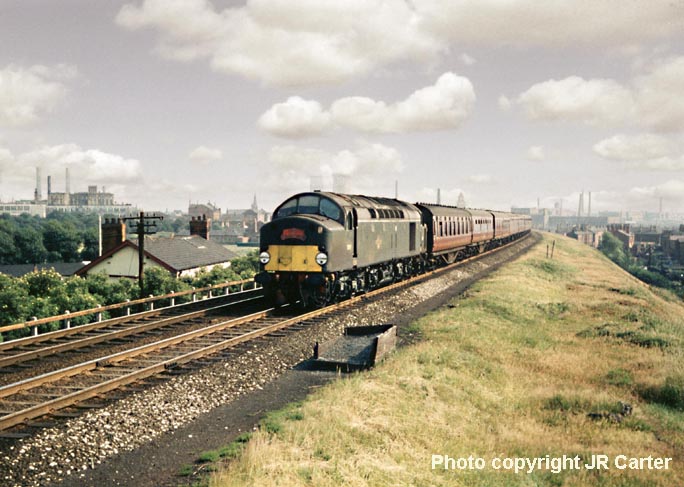
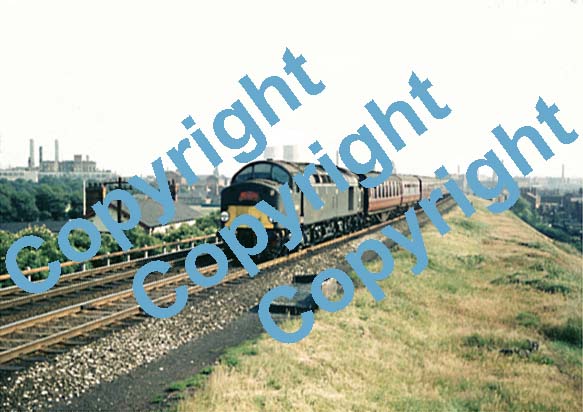
(Below) With the digital revolution gathering pace in recent years, the use of image editing has gone ballistic! Back in 2001, I began practising retouching my old railway photos for a bit of fun and found the experience extremely uplifting. It proves that if a batty old technophobe like me can alter a photo (I'm barely in possession of my faculties, let alone any technical wizardry) then it isn't beyond the average computer user too. With a little patience, anyone who has spent half an hour fooling around with imaging software knows how easy it is to tamper with a photo. Of course, you need to know something about traditional photography skills, along with a knowledge of light and shade, colour and perspective, though you'll doubtless learn this as you go along. I learned a few lessons while working on the Aire Valley photos at Kirkstall, Leeds, including this one (complete with its very own watermark...yes, you've guessed it - the sky!) It doesn't matter how big or small your own photo-enhancing project is, the restoration of your old railway photographs is essential. You are preserving an important part of our history and giving future generations a glimpse of their past. 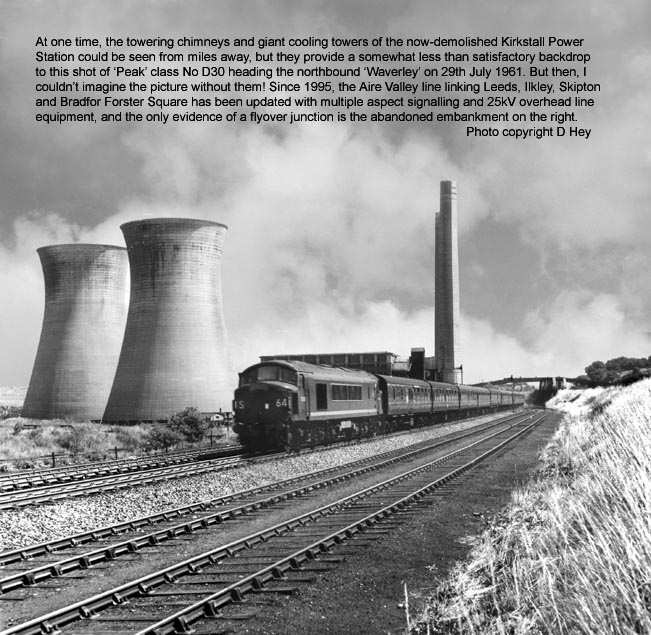
(Below) Needless to say, there is much more to Photoshopping than adding fluffy clouds or air-brushing an unsightly pimple from a super model's chin! For example, Richard Greenwood wondered if I could do anything with this artistically framed view of the East Lancs section of Preston railway station. On closer inspection, the locos in the picture include a L&Y 4-6-0 or 4-6-4T, a L&Y 2-4-2T plus a Derby 4F 0-6-0 on a passenger, which dates it to LMS days, but Richard was trying to pin it down to a particular year.
Well, all this talk of Adobe Photoshop being the saviour of all things digital reminds me of the expression - 'Put your money where your mouth is!' ...for this badly-scratched photo is in dire need of personal care and attention, but perhaps it was beyond any hope of salvation? 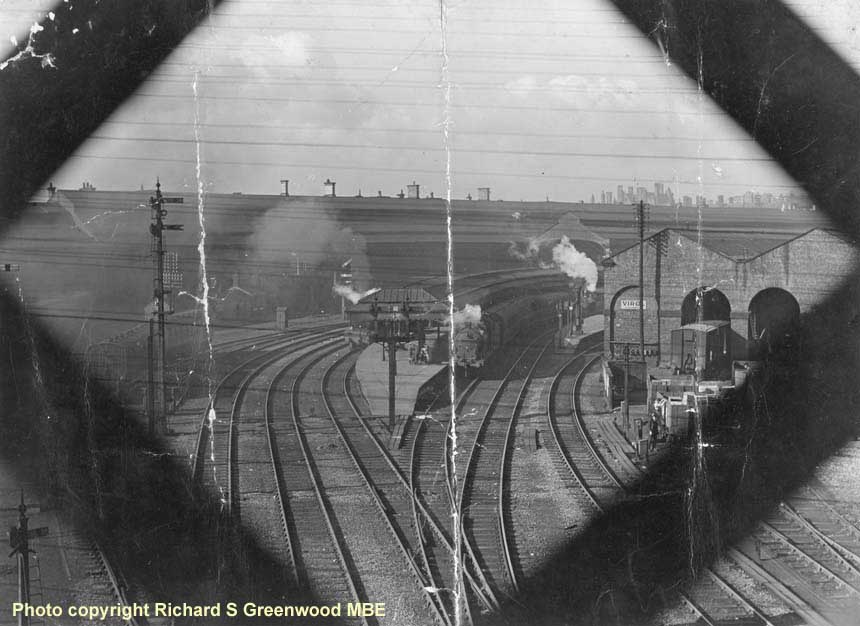

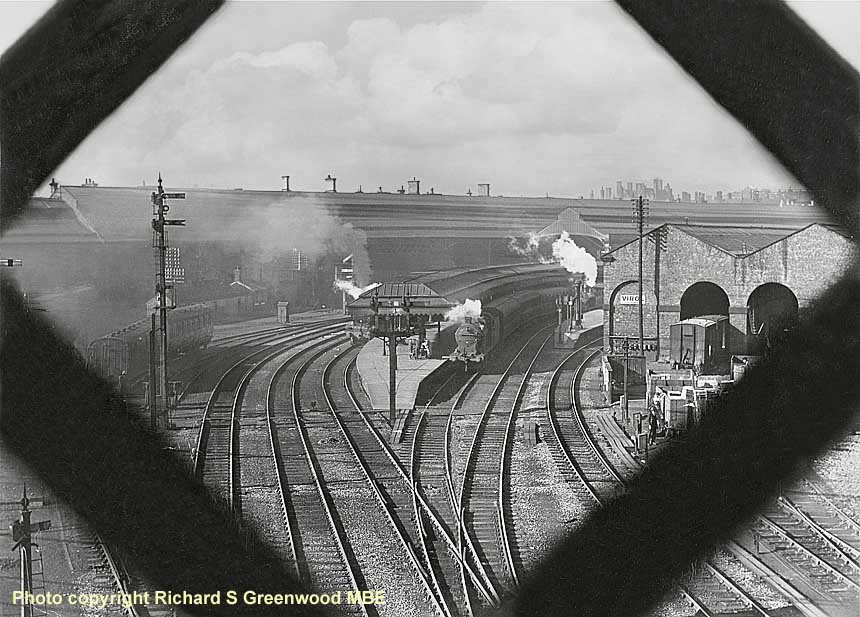
(Above-Below) Well, I can't resist a challenge and so (to cut a long story short) after it was finished Richard contacted a leading light in the Lancashire & Yorkshire Railway Society, who replied - 'Nice shot, the locos are a Hughes 4-6-0 (earlier series), a LMS 4F 0-6-0 (unusually no front numberplate) and a L&Y Radial tank. Both tender locos have the old white ceramic shedplate which puts it before Jan 1935 and the down LNWR signal hasn't had its distant arm repainted though the LYR up one has (black fishtail on the back) thus putting it around 1930 possibly. Goods stock not much help, the two covered goods are Grouped railway standards (possibly LNER). All the carriages look to be pre-Group ones. Hope this helps...'
Yes it does...but, oh dear - mention of the LMS 4F 0-6-0 with 'unusually' no front numberplate sent alarm bells ringing!
Perhaps I made a mistake and accidentally removed the numberplate?
I don't think so, but I will leave others to judge...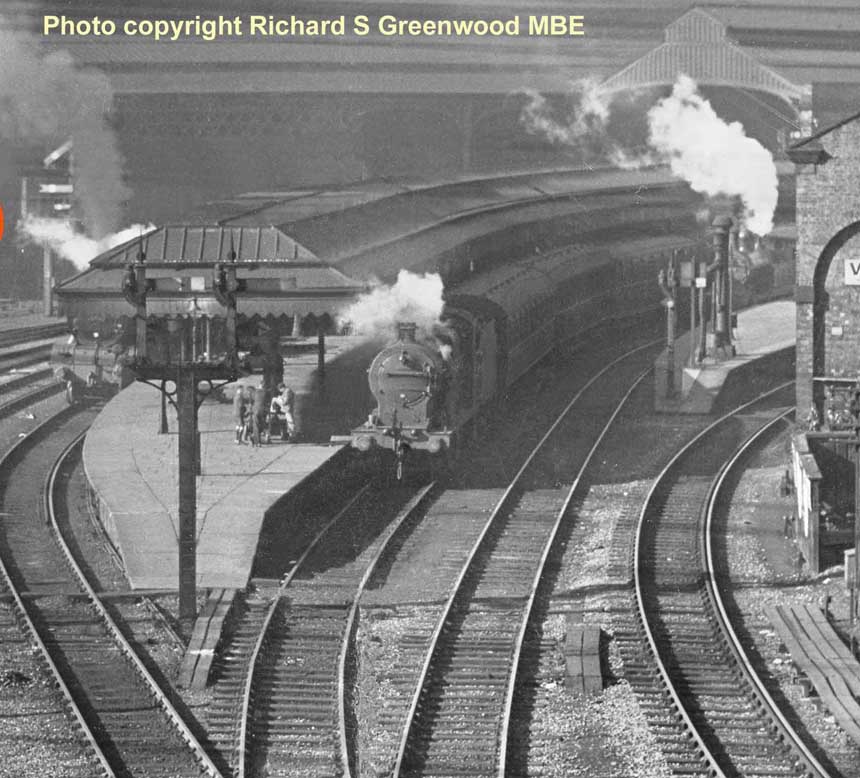
(Above-Below) Because photo-manipulation is commonplace nowadays, faked photos are much harder to detect - and I'm not talking about air-brushing out a super model's blemishes. Who cares, anyway? The biggest concern is the way photo-manipulation is used by the news media, raising the issue of ethics in photo-journalism. It begs the question how far you can push the boundaries of digital image manipulation and still maintain an acceptable level of integrity. For example, photo manipulation creates an illusion, which, by its very nature is a deception, so while I admit to adding skies to photographs to enhance the image (and protect the copyright of a picture) it does raise concerns about the ethics of it. But then, it is vastly different than, say, changing the number of a locomotive. It smacks of foul play, and I definitelydraw the line at that! What interests me more is photo-restoration and Dai Pickup's shot of 'Peak' class D198 at Retford on 18th July 1961, is a case in point. A clone stamp was used to remove the hairs around the signal and sky...a slight 'tweak' of colour correction, a bit of sharpening - and the job is done.

EXTREME PHOTOSHOPPING
Getting up close and personal with a photographer's work...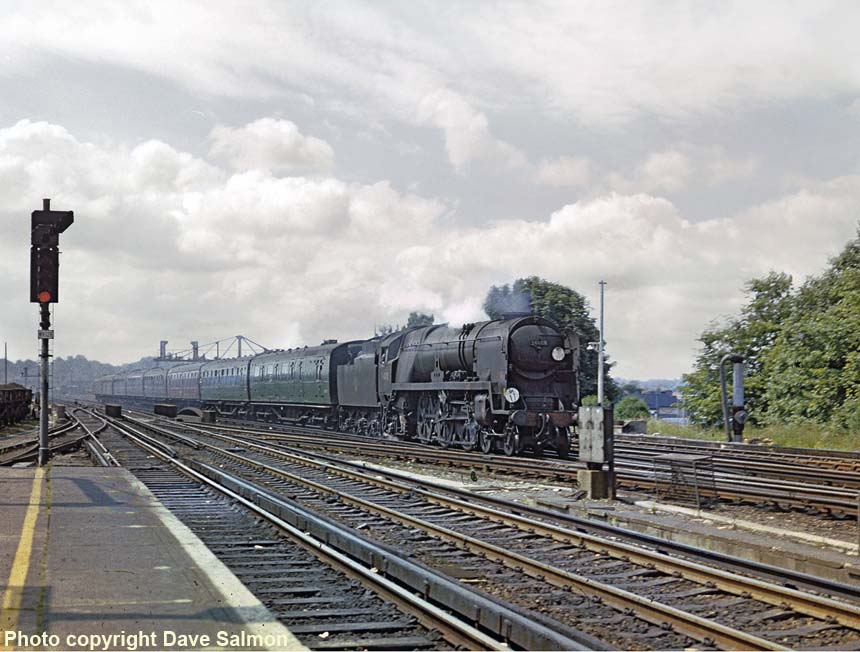
(Above-Below) Dave Salmon is an ex-fireman at Guildford Loco (70C) who travelled far and wide to capture some astonishing colour images of BR steam's final days. This is a great shot (above) taken from Woking down local platform (5) of Rebuilt West Country Class 34008 'Padstow' (minus her nameplates) working an 'up' semi-fast passenger service from Bournemouth to Waterloo on Saturday 3rd June 1967. Fast-forward forty-odd years and Dave's transparencies have been scanned (digitalized) for posterity by his work colleague, former Guildford fireman Geoff Burch, however it is clear from the 'before-after' samples shown (below) that his collection of slides has suffered dreadful deterioration with the passing of years. Thank goodness for the wonder of Adobe Photoshop... along with a heavy chunk of patience, for it has taken some serious Photoshopping and hours of staying power to help bring Dave's slides back to life again. Now I haven't posted this section of the page to show how clever I am...on the contrary, these examples clearly illustrate what can be achieved in Photoshop. The surface of the original slide (below) has been got at by the worst of enemies: dust and damp...and the only solution was to remove the blemishes and copy a new skyscape from another image and paste it onto the photo. If these before-after examples encourages others to have a go at resurrecting their own collections then this posting has been well worth the effort. 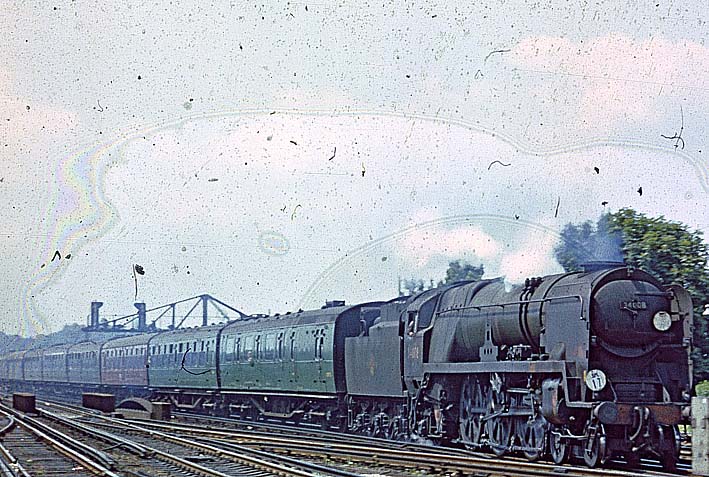
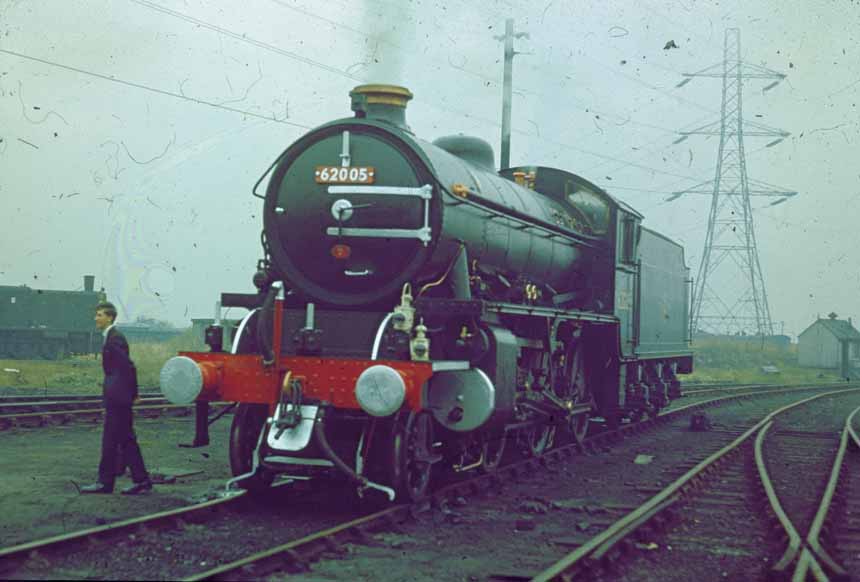
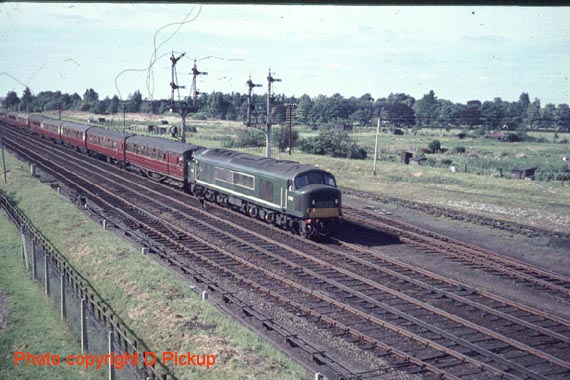
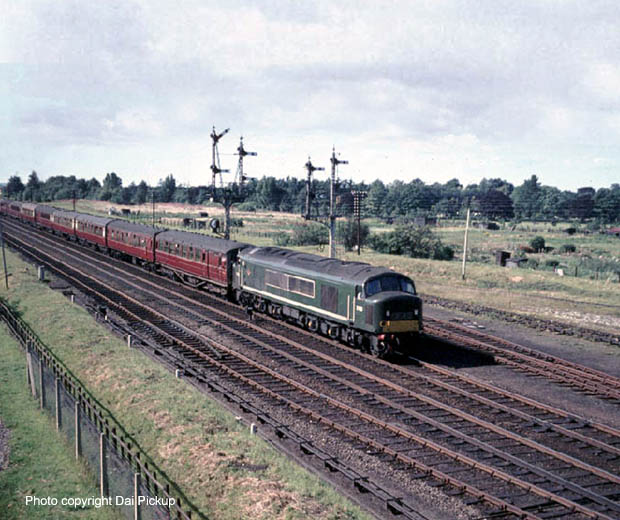
(Above-Below) By September 9th 1967 steam came to an end in the north east and the locomotive sheds at North Blyth, Sunderland, Tyne Dock and West Hartlepool were closed. The once-familiar sight of Q6s and J27s were now replaced by Claytons, Sulzer Type 2s and the sturdy EE Type 3s. On September 9th 1967, Alan Peglar, then owner of preserved Class A3 'Flying Scotsman', along with the Gainsborough Model Railway Society, organised the 'Newcastle Railtour' from Kings Cross. The train was made up of nine Mk1 coaches hauled by D1994 from Kings Cross to Peterborough, where 'Castle' class No 7029 took over for the run north - but only as far as King Edward Bridge Junction. This was due to clearance problems with the Castle's cylinders at Newcastle Central, therefore the now-preserved Class K1 No 62005 was called upon for the remainder of the run into Newcastle. In this instance a clone tool was used to clean up the sky - tricky around the pylon - before the colour tones were corrected. 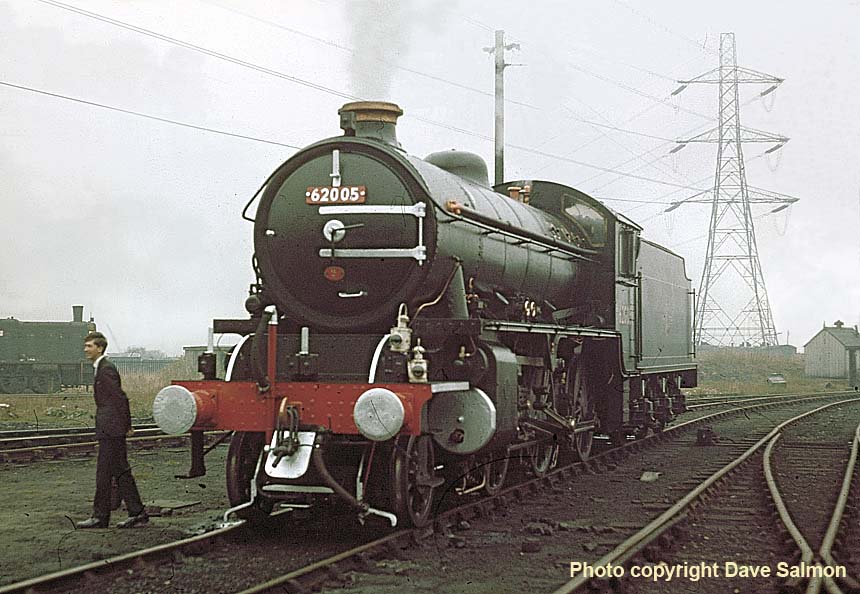
(Above-Below) Before and after Photoshopping can be seen in these two fine views of Oxford MPD (81F) on 30th November 1965; in both instances the blemishes in the sky were painted out (leaving an uninteresting featureless area) hence it was necessary to import a suitable sky from another image and paste it on top using the clone tool.
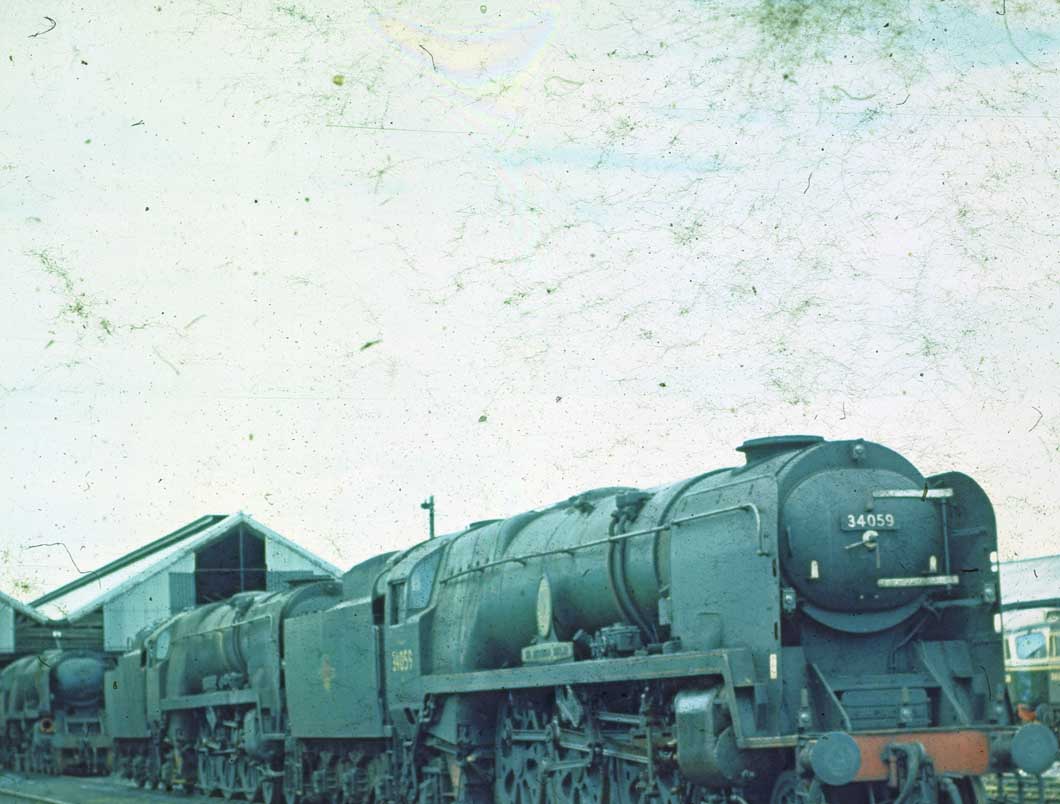
(Above-Below) Rebuilt Battle of Britain Class 34059 'Sir Archibald Sinclair', Rebuilt West Country Class 34032 'Camelford' and Rebuilt Battle of Britain Class 34082 '615 Squadron' await their fate at Eastleigh MPD on 11th June 1966. A pair of type 3 Crompton Diesel-Electric locomotives stand nearby - two of the steam locomotive's fate are sealed - 34059 is preserved and can be seen working on the Bluebell Railway.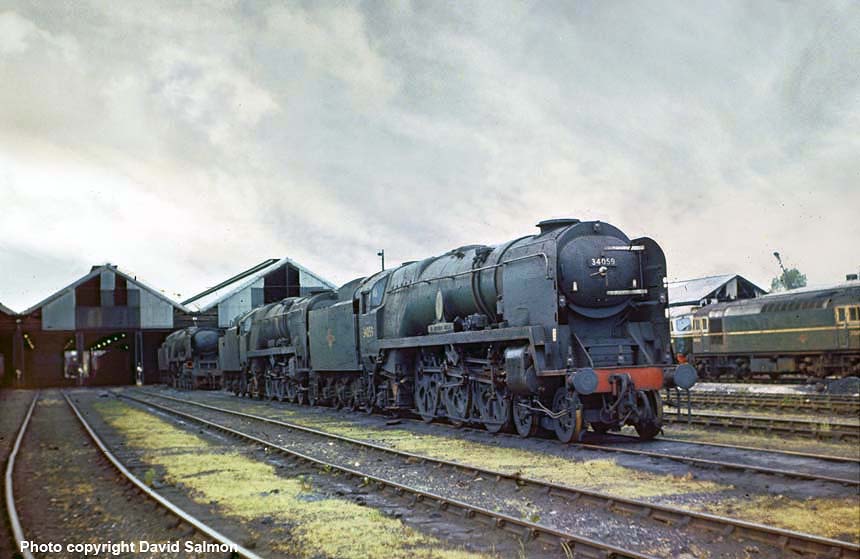
(Above-Below) An elderly EMU (headed by an unidentified 2 BIL) approaches Woking. The 2-BIL units (2-car Bi-Lavatory stock) were so-called because each set had two lavatories, one in each car. They were built at Eastleigh in four batches, each for service on newly-electrified lines and had two English Electric traction motors of 275 hp (205 kW) each. The black inverted triangle painted on the front was for the assistance of station porters and was also painted on the Driving Motor Brake vehicles of SR 2-car & 3-car multiple units to afford an early identification that there was no luggage accommodation at the other end of the unit.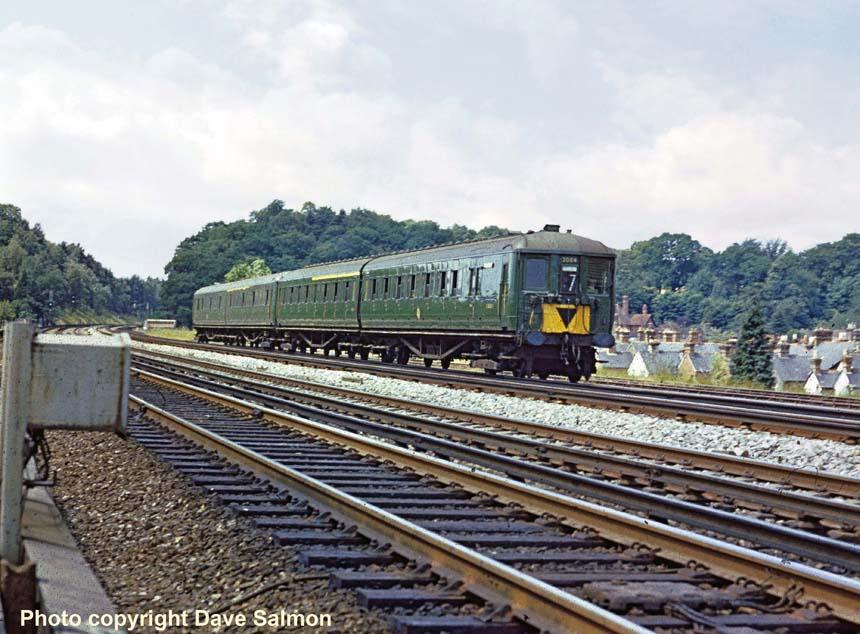
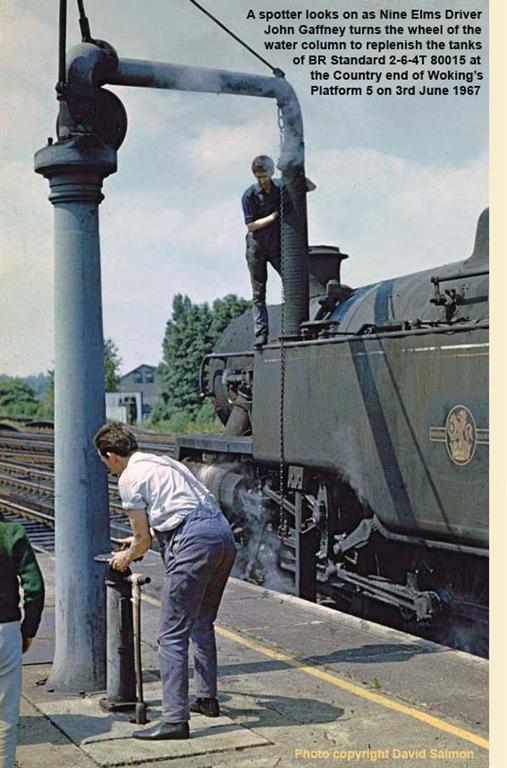
(Above-Below) Some judicial use of the clone tool has removed most of the blemishes in this shot of BR Standard Class 4MT 80015 replenishing her side tanks at the Country end of platform 5 on 3rd June 1967 before setting off with a parcel service for Basingstoke. Click here to see the full image...
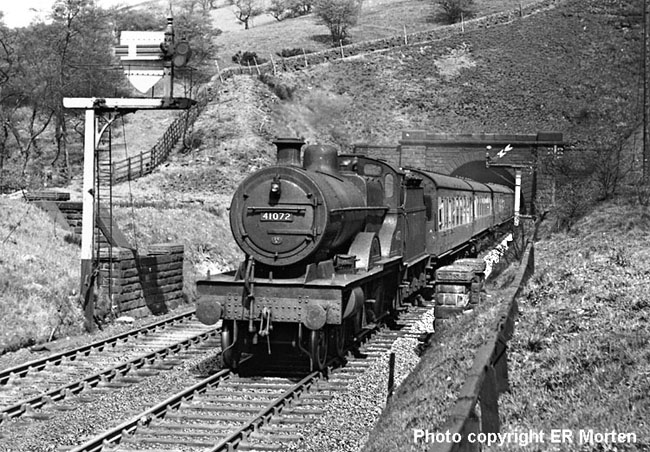
(Above-Below) Moving away from pesky skies to troublesome freshly-laid ballast! A major feature of the Trans-Pennine route between Manchester and Sheffield via the Hope Valley is the 3,702 yard-long Cowburn tunnel where the summit of the line is situated about a quarter of the way inside the tunnel from the Yorkshire end, with a gradient of 1 in 100 falling eastwards and 1 in 150 to the west. In this classic ER Morten shot, Midland Compound 4-4-0 No 41072 emerges from Cowburn Tunnel with a local train for Chinley in May 1953. A clone stamp was used to reballast the track...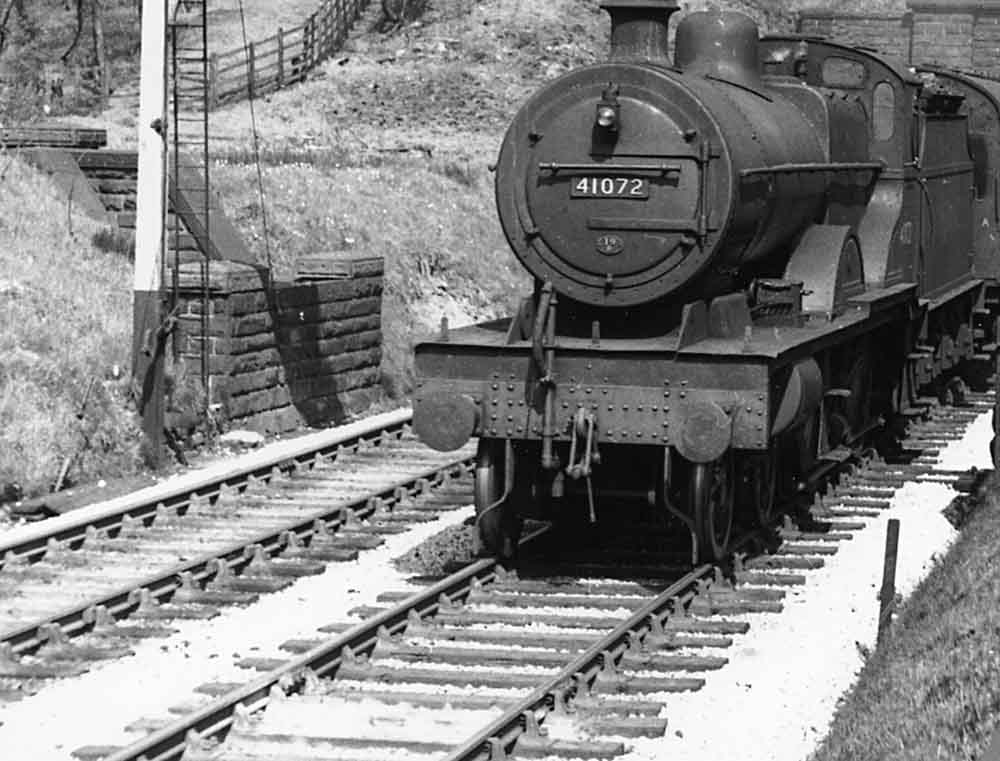
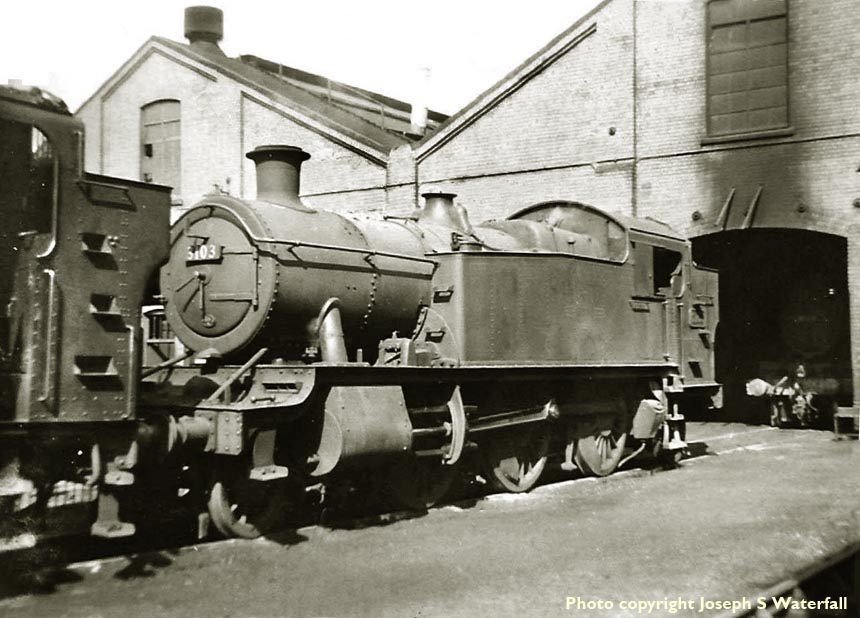
(Above-Below) Another brick in the wall! Joseph Waterfall took this difficult shot of light and shade tussling with one another (bleaching out the brickwork) with 2-6-2T '81XX' class 8103 reposing in the yard at Newport MPD in June 1959; careful use of a cloning stamp was used to rebuild the the shed brick by brick! 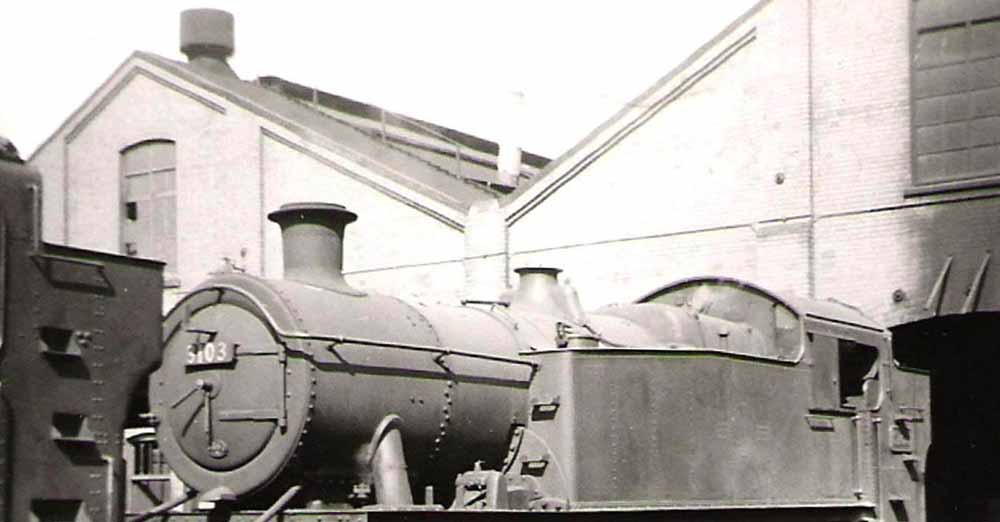
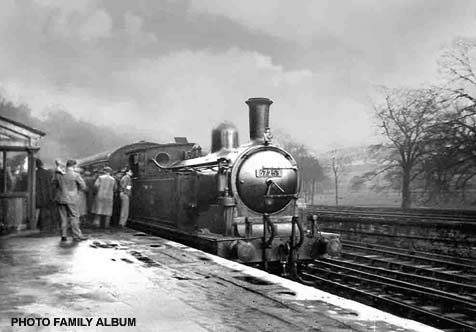
(Above) I recently found this lovely old photograph of Pateley Bridge station tucked inside a family photo album. The 50-odd year-old print was in a terrible state - faded with age, badly scratched and torn along the bottom edges, but rather than consign it to the bottom drawer I set about trying to restore it in Adobe Photoshop. I suppose you could say that it's lucky I found it when I did because in spite of its poor  condition, it still survives today albeit in digital form. The Pateley Bridge branch diverged from the Harrogate-Ripon line at Ripley Junction and ran along the Nidd Valley to a single-platform terminus at the foot of the main street at Pateley Bridge. The track continued over the level crossing to some sidings serving Scot Gate Ash quarries, and from 1907, this gave a connection to the Nidd Valley Light Railway - a line used for conveying materials to Bradford Corporation's reservoirs, but it was also used for carrying passengers between Pateley Bridge and Lofthouse. During steam days, four trains ran in each direction daily on the Harrogate-Pateley Bridge service, with additional trains on Saturday. Most workings were performed by Wilson Worsdell's Class G5 0-6-0T No 1839, which continued to work the branch as No 67253 until closure in April 1951. No 67253 is seen on the last day of service at Pateley Bridge - goods traffic continued until 1964. Photo copyright Family Album.
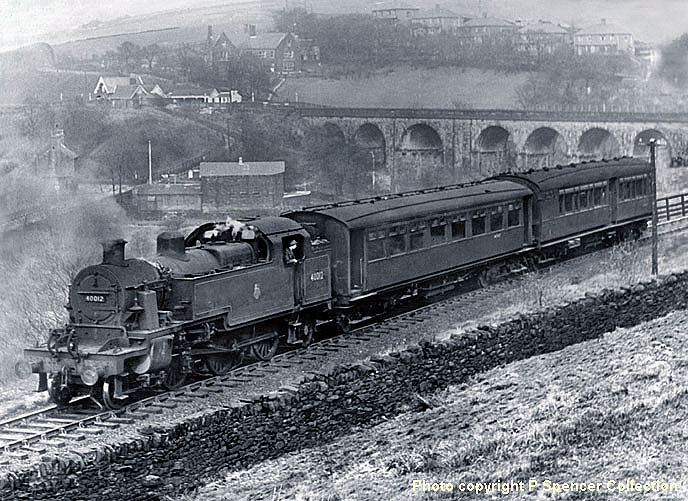
(Left-Below) Some photos are beyond salvation, but if there is a discernible image to work on they are always worth saving. I include this shot of the push-pull 'Delph Donkey' being propelled by Fowler Class 3MT 2-6-2T No 40012. Visible in the background is Saddleworth station (closed 5th October 1968).
MYSTERY PHOTOGRAPHS SOLVED!
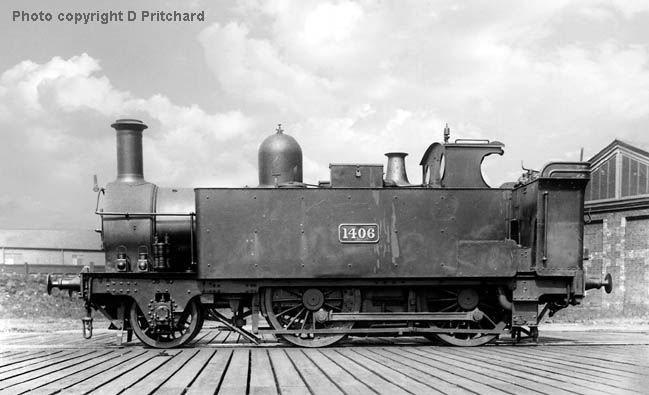

(Above Left) This photo of a collision-damaged 2-4-0T No 1406 had me baffled! I'm pretty certain of its GWR origin, but not too sure who designed it - William Dean or CJ Churchward? Subsequent research in books and magazines revealed nothing, therefore I was about to publish it on the web in the hope of finding someone who could solve the mystery, but something didn't look quite right in the photo. Then it hit me! The rear of No 1406 had not suffered collision damage after all. It looks as if the horizontal and vertical lines have been geometrically distorted by the camera lens (probably a plate glass camera) and the building on the right is sloping upwards and outwards. Nonetheless I do like this photo - the boards in the foreground lead your eye into the shot perfectly, so it was worth correcting the distortion in Adobe Photoshop (above right) - and yes, I added the sky - surely, another case of photo-manipulation that should be taken with a hefty pinch of salt! Meanwhile, the identification is solved! My thanks to Jim C who contacted me with details of the 'Kenton Model Railway Project' website, which has a gallery page of GWR 2-4-0T Metro class locomotives including this same photo amongst them.
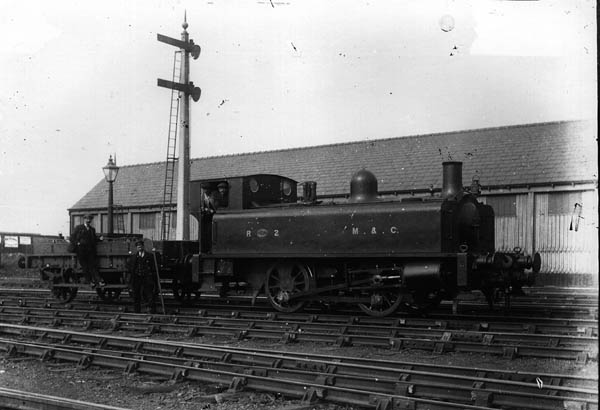
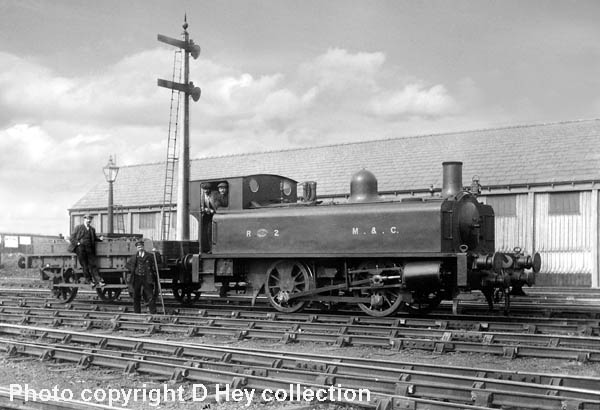
(Below) Is there any truth in the saying: 'One man's junk is another man's treasure?' Yes there is, particularly in today's disposable society. People carelessly dump unwanted rubbish from the past without giving any thought to its true value. This is especially the case when someone passes away. A few months ago, I was handed this shot of Maryport and Carlisle Railway 0-4-0T No R2 with a curious dual-purpose buffer beam (standard gauge and narrow gauge). As you can see from the 'before' photo, the original print is in a dire state, though this is hardly surprising in view of its age. While salvaging it in Adobe Photoshop, John Edgington of the Friends of the National Railway Museum came to the rescue with details of the locomotive. Built by Neilson & Co of Glasgow in 1881 - works no 2737, the 0-4-0T had 3' 8" wheels and 14"X20" cylinders. The M & C renumbered the engine No R2 in 1897. The LMS allotted the number 111230, but this was never carried. The loco was withdrawn in 1924.
 |  |
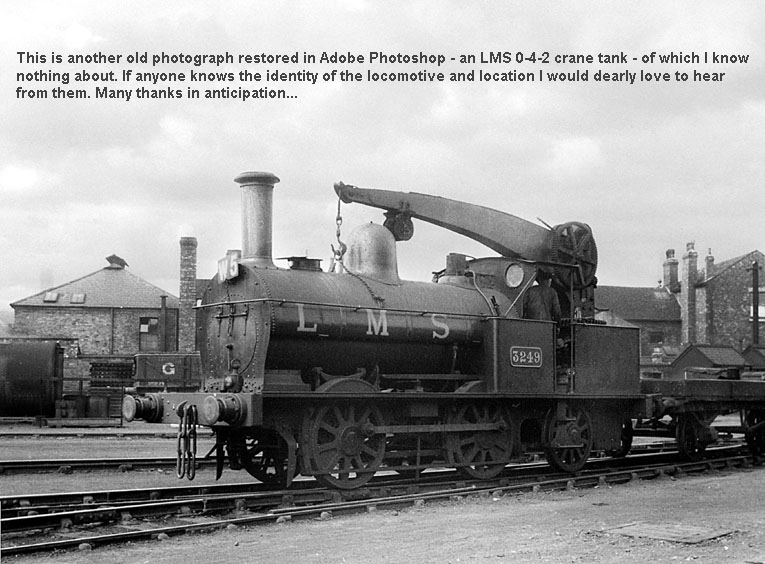
(Above) Mystery solved! Hugh Robertson writes - 'According to the website 'British Steam Locomotives' - www.britishsteam.com, this is an LNWR 0-4-2WT Crane Tank 0F BR loco classification. It was built at Crewe in November 1894 and withdrawn in December 1947. It was cut up at Crewe in March 1948. As it was a works loco, presumably the picture is at Crewe Works.' Matt Harper also writes: 'The picture of an LMS crane tank engine is of a F W Webb designed engine built at Crewe Works for the L&NWR in the late Victorian period, the board showing W5 makes me think it is on the 'Works No 5' trip - a duty within Crewe Works. The architecture looks right for this location and the extra coupling chain to enable work on tight curves tend to support this theory.' Matt also provides a link to the excellent London & North Western Railway Society's website page featuring this particular loco class. My thanks to both Hugh and Matt for their kind assistance.
(Above) Another mystery solved by Jim C...the 0-6-0s are GWR Standard Goods (aka Armstrong Goods or 388 class) showing both positions of steam domes. Jim also mentions that photos of this 0-6-0 class are rare on the web, so for the benefit of modellers I reproduce two versions (larger than screen size) of individual locos on the 'Railway Modellers' page. Click on photos to view the images. There is also a link to 'GWR Modelling' showing a fine 4mm model built by Dave Perkins from a NuCast kit.
STRETCHING THE POINT!
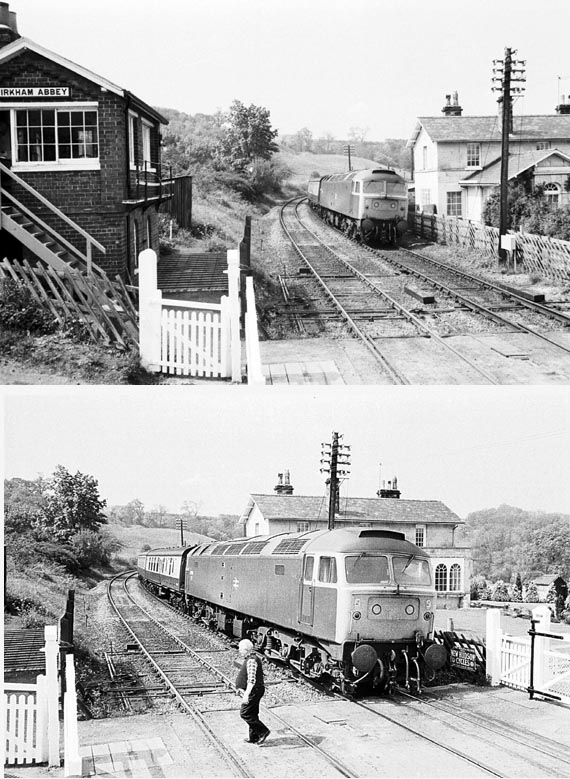
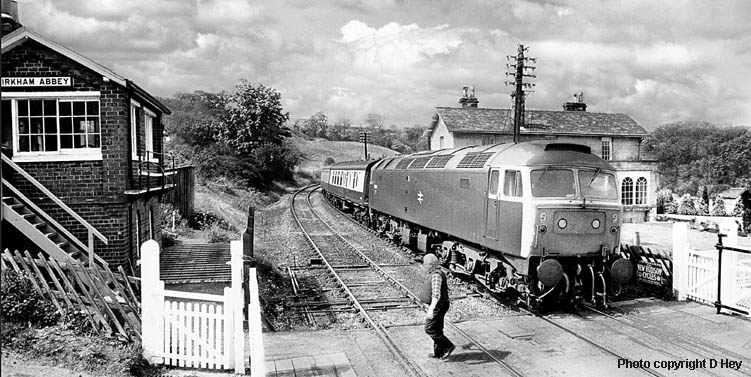
(Above-Below) Sometimes it is difficult to capture the moment in a photograph. Even a 26mm wide-angle lens may not be wide enough to get the photo you want. Both shots (above) are crying out to be joined together...the crossing gate (left foreground) acts as a perfect promontory to connect the images without any distortion. The signalman is returning to the box having warned the driver of a 10mph restriction due to a landslip at Kirkham Abbey on the York-Scarborough line. The full story is better told by cobbling both images together and creating the picture below. I was tempted to remove the telegraph pole sprouting from the loco, but decided against it. I did add the sky, though!
(Below) Work in progress...click on photo to read the story on the 'Tebay, Lune Valley & Shap' page
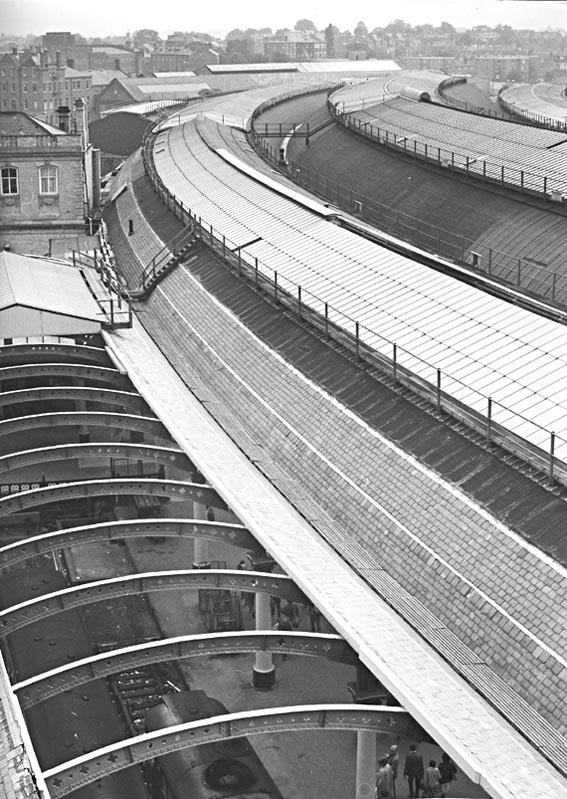
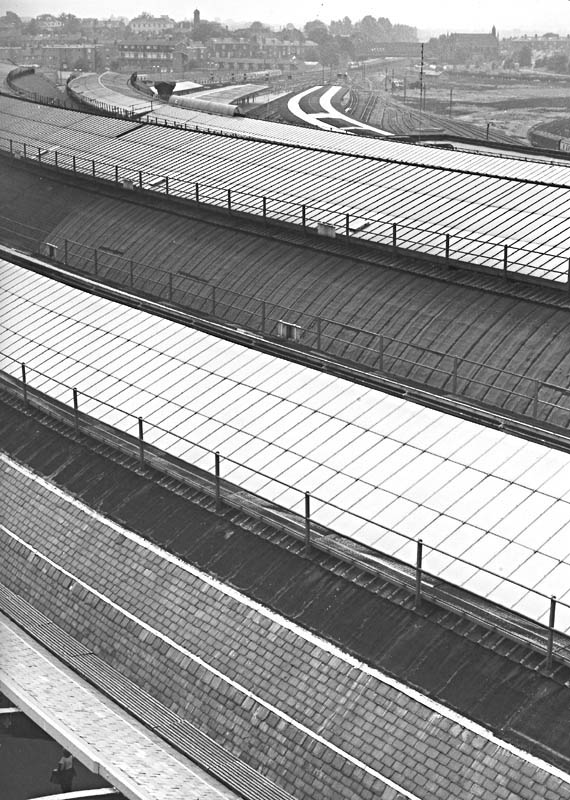
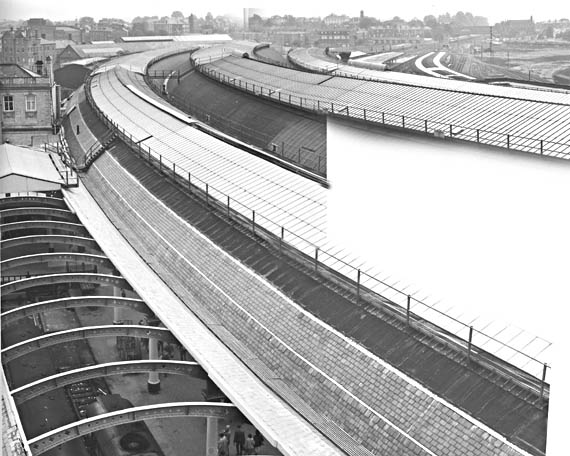
(Above-Below) Work in progress...or perhaps it will never get finished at all? The curvature of York station roof has so many angles at odds with each other that it's virtually impossible to marry both vertical 26mm wide-angle shots into one satisfactory whole without distorting the image…
In fact, having spent countless hours trying to cobble it together I finally gave up, and I thought it would be the end of the matter.
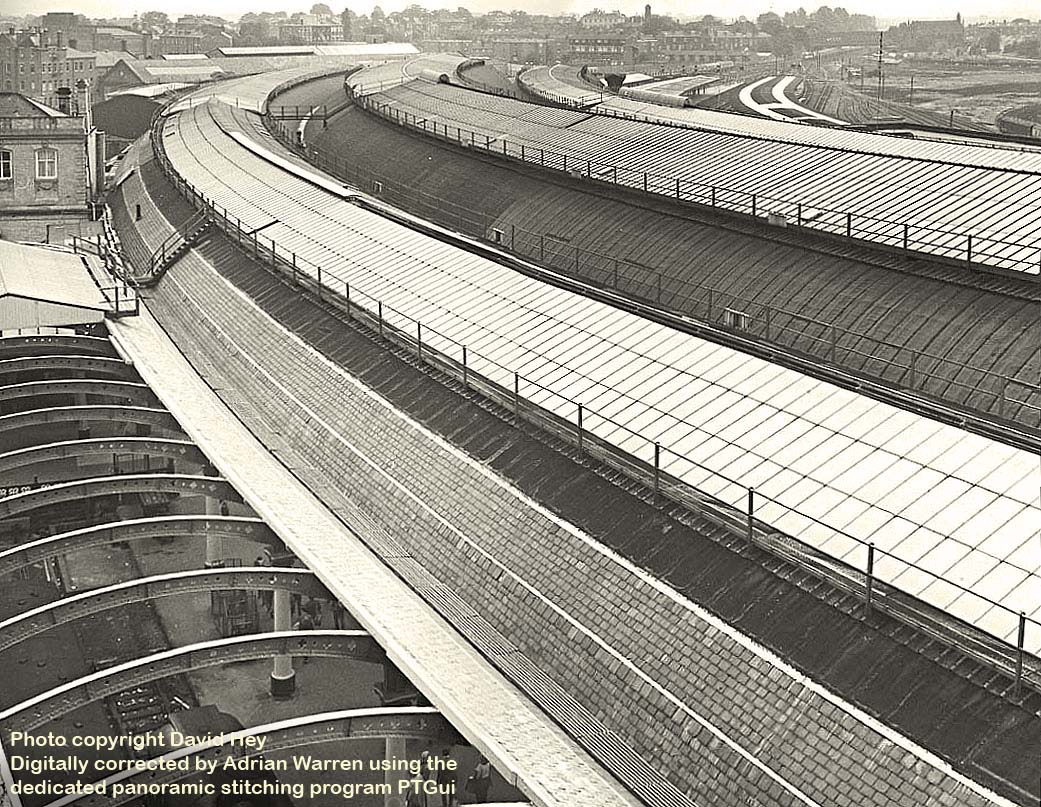
Then, out of the blue, came this email from Adrian Warren, who writes...
'Hi David, I've really been enjoying reading your site; and I think there's something I can help you with? On your BR Rail Photo Workshop page you have a 'Work In Progress' of the roof of York Station. There's a very easy way to get those two pictures combined; full Photoshop now has some panoramic merging capabilities. They're fully automatic, and my first result is attached to this email. However, I also used a dedicated panoramic stitching program called PTGui, and attach the results of that too! (See Below).
PTGui required a lot more work as I had to add the control points manually; usually it can do that automatically; but the alignment of those two shots is tricky.
Anyway I thought that might be of some interest. Please keep up the hard work on your site.
Kind regards, Adrian.
Well, it goes without saying that I'm thrilled with the result, and my sincere thanks to 'Maestro' Adrian for taking the trouble to stitch the two images together...I wish I'd taken more now!
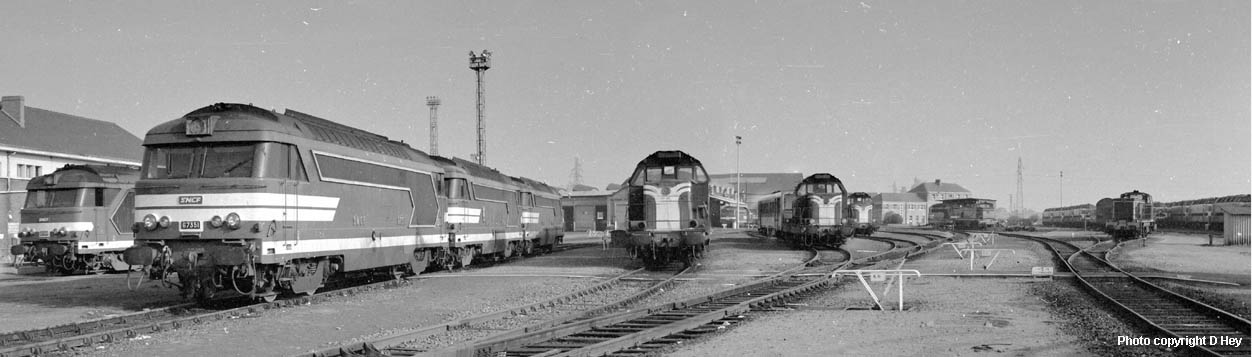
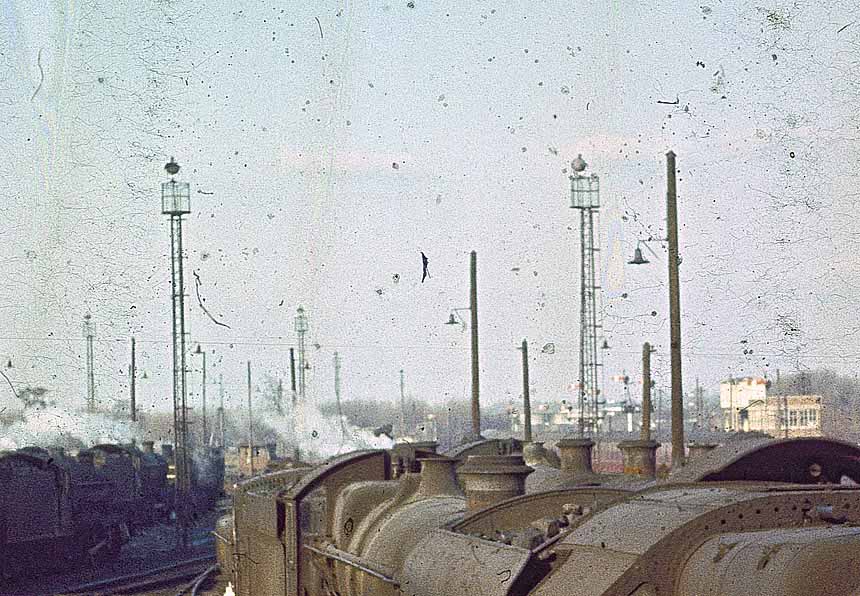
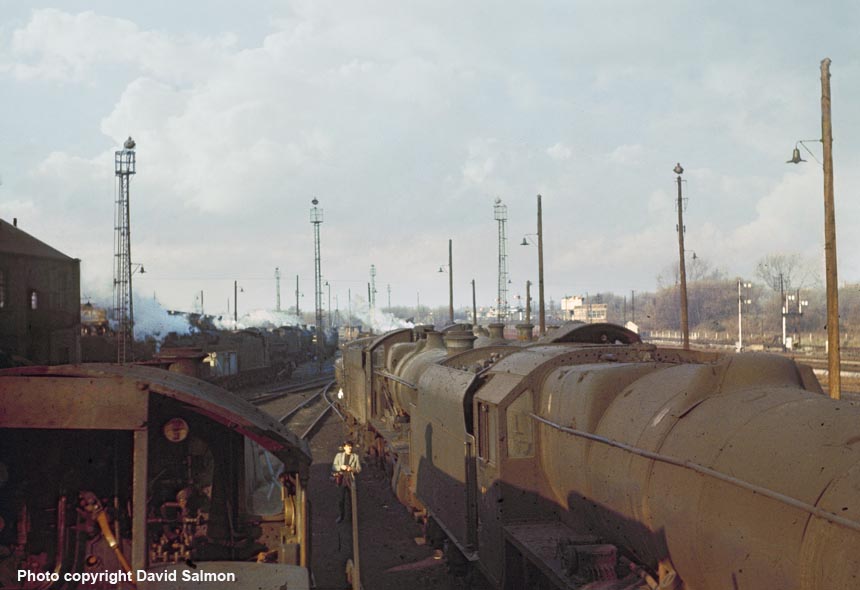
(Above-Below) An extreme case of wide-angle photography at Nantes shed, France, again using two 26mm photographs. Does this make it a 13mm shot? The shunter in the middle distance (centre) anchors the individual photographs together. (Below) Another classic example of 'photoshopping'. It beggars belief that anyone is offended by such an obvious case of image manipulation. It clearly illustrates what can be done in today's digital age.
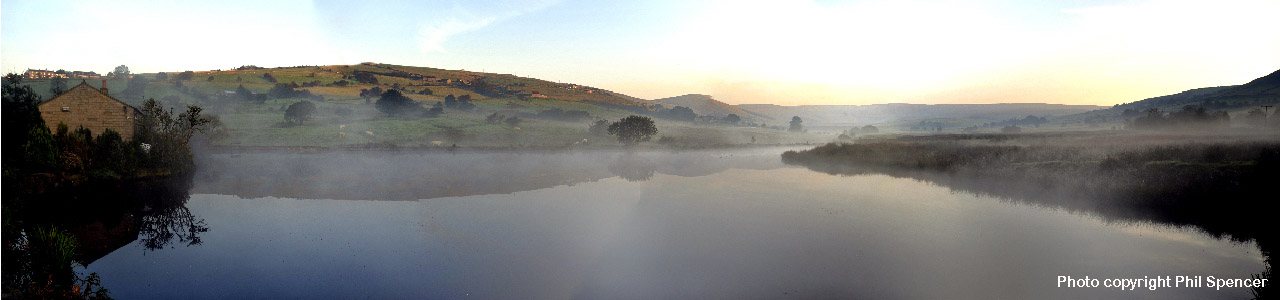
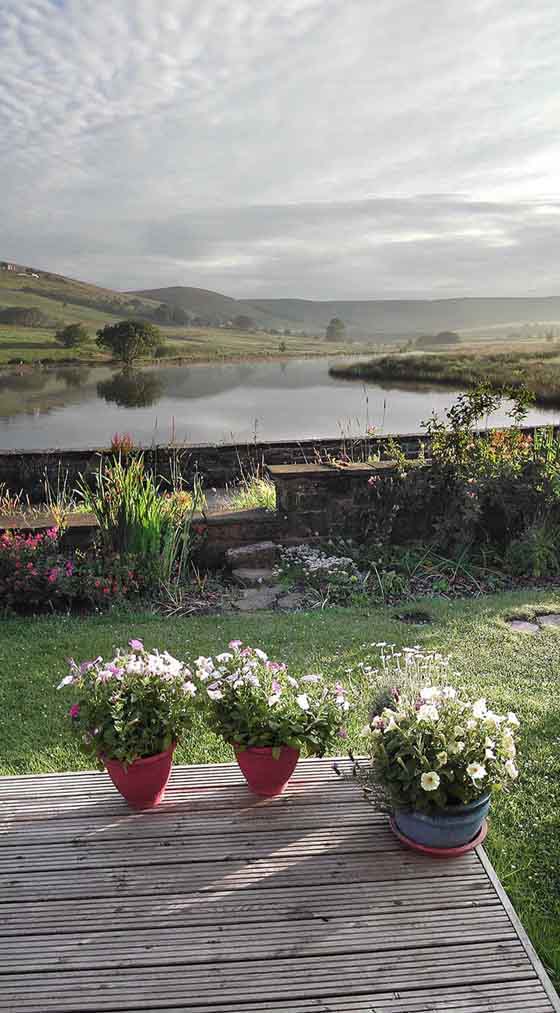
(Above-Below) Phil Spencer's wide-angle shots of early morning sunlight rising above the Pennine hills are superb! Both are compilations of three shots - one horizontal, the other vertical - both capturing the early morning sun over the old mill pond in Castleshaw Valley at Delph. Click on photo above to see the wide-angle image.
The world wide web is a marvelous educational tool; you can learn so much by visiting hundreds of thousands of sites covering every subject under the sun. I do recommend visiting two fabulous sites which deal with the moral principles relating to Digital Photo Manipulation. The Astropix.com website is one, and the enterprising About.com website another - both tackle the subject head on...
Polite notice: All text and photographs are protected by copyright and reproduction is prohibited without the prior consent of the © owners. If you wish to discuss the contents of this page the email address is below. Please note - this is not a 'clickable mail-to link via Outlook Express:
dheycollection@ntlworld.com


